
STEPS FOR BONDING HARDWARE TO WOOD
by Rob Monroe

![]()
![]() Hardware bonding is a technique commonly used
in the construction or repair of wooden boats. In this process, both the
hardware and fasteners are glued directly to the wood surface. Especially
useful for mounting hardware on curved or uneven surfaces, its purpose is
to increase the hardware's load capacity. It also seals the pilot holes
off from moisture, reducing the possibility of leaks or rotted wood.
Hardware bonding is a technique commonly used
in the construction or repair of wooden boats. In this process, both the
hardware and fasteners are glued directly to the wood surface. Especially
useful for mounting hardware on curved or uneven surfaces, its purpose is
to increase the hardware's load capacity. It also seals the pilot holes
off from moisture, reducing the possibility of leaks or rotted wood.
The first step in the process is to prepare the mounting surface and
hardware base 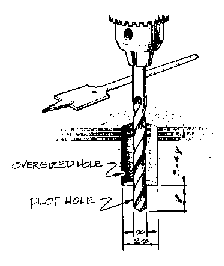 for proper adhesion. Both surfaces must be cleaned
using lacquer thinner, acetone or another appropriate solvent. Before the
solvent dries, the surfaces should be wiped with paper towels.
for proper adhesion. Both surfaces must be cleaned
using lacquer thinner, acetone or another appropriate solvent. Before the
solvent dries, the surfaces should be wiped with paper towels.
Once cleaned, the surfaces must be thoroughly dried. A hot air gun or hair dryer can be used to accelerate the process, if necessary. The final step in surface preparation is to sand the smooth, non-porous surfaces, ensuring that they are thoroughly abraded. An 80-grit aluminum oxide paper will produce a good texture for proper epoxy adhesion.
Drilling oversized holes allows more epoxy to surround the fastener for increased strength and stability. To do this, drill a large hole 2/3 to 3/4 of the depth of the fastener, with a diameter up to twice the size of the fastener diameter. Then drill a normal sized pilot hole at the bottom of the oversized hole to the full length of the fastener. This holds the hardware in position until the epoxy cures.
When the surfaces are prepared, wet out the oversized hole with epoxy, allowing it to soak into the exposed end grain of the wood. The bottom contact surface of the hardware should then be coated with unthickened epoxy. Use a wire brush or 50-grit sandpaper to work the wet epoxy into the surface.
A mixture of epoxy and an adhesive filler, such as WEST SYSTEMO 404 High-Density filler or 406 Colloidal Silica, should then be injected into the hole. Enough mixture should be used to ensure that no air bubbles are trapped in the hole after the fastener is inserted. Next, coat the bottom of the hardware and fastener threads with thickened epoxy.
Place the hardware into position. Then, insert and tighten the fasteners until a small amount of the mixture squeezes out of the joint. The excess epoxy can then be removed or shaped into a fillet. Once these steps are completed, the epoxy must cure for at least 24 hours before load is applied to the hardware. An even longer cure time should be allowed in cool weather.
Bonding the hardware base in addition to the fasteners provides a stronger, longer-lasting attachment than bonding just the fasteners or doing a conventional, dry fastener installation. Following these steps should lead to a durable, secure bond that will last for years to come.
Editor's Note: Rob Monroe is president of Gougeon Brothers, Inc., which produces the WEST SYSTEM and PRO-SETO lines of epoxy products. The company can be reached at P.O. Box 908, Bay City, MI 48707. Phone: 517-684-7286; Fax: 517-684-1374. Website: www.westsystem.com. 404 High-Density filler and 406 Colloidal Silica are trademarks of Gougeon Brothers, Inc.